Showing posts with label experiment. Show all posts

Tuesday, July 14, 2020

Upcycling a Treasure Trove, Saving the Environment


Every now and then, it's an exciting challenge to work with new material, something unfamiliar or unusual that kicks up your creative spark and leads you down some new paths. Over the next few posts, I'm going to share my adventures in using upcycled materials in my jewelry.

Last fall, I went to a local event held twice a year, created with the mission to keep material out of the landfill. It's a treasure trove of designer samples, construction materials, and miscellaneous stuff, all free for the taking. Artists, creators, teachers, and anyone who's curious enough to walk in can walk out with as much as their arms (or bags and carts) can carry.

It. is. AWESOME.

This was the second time I had gone. This time, my target was fabrics and trims that could be repurposed into jewelry. Holy crap, y'all, I found the mother lode. Books and books and books of designer trim samples. Tassels and gimp and ribbon trim. Faux leather in every finish and color you could imagine. I was absolutely giddy.

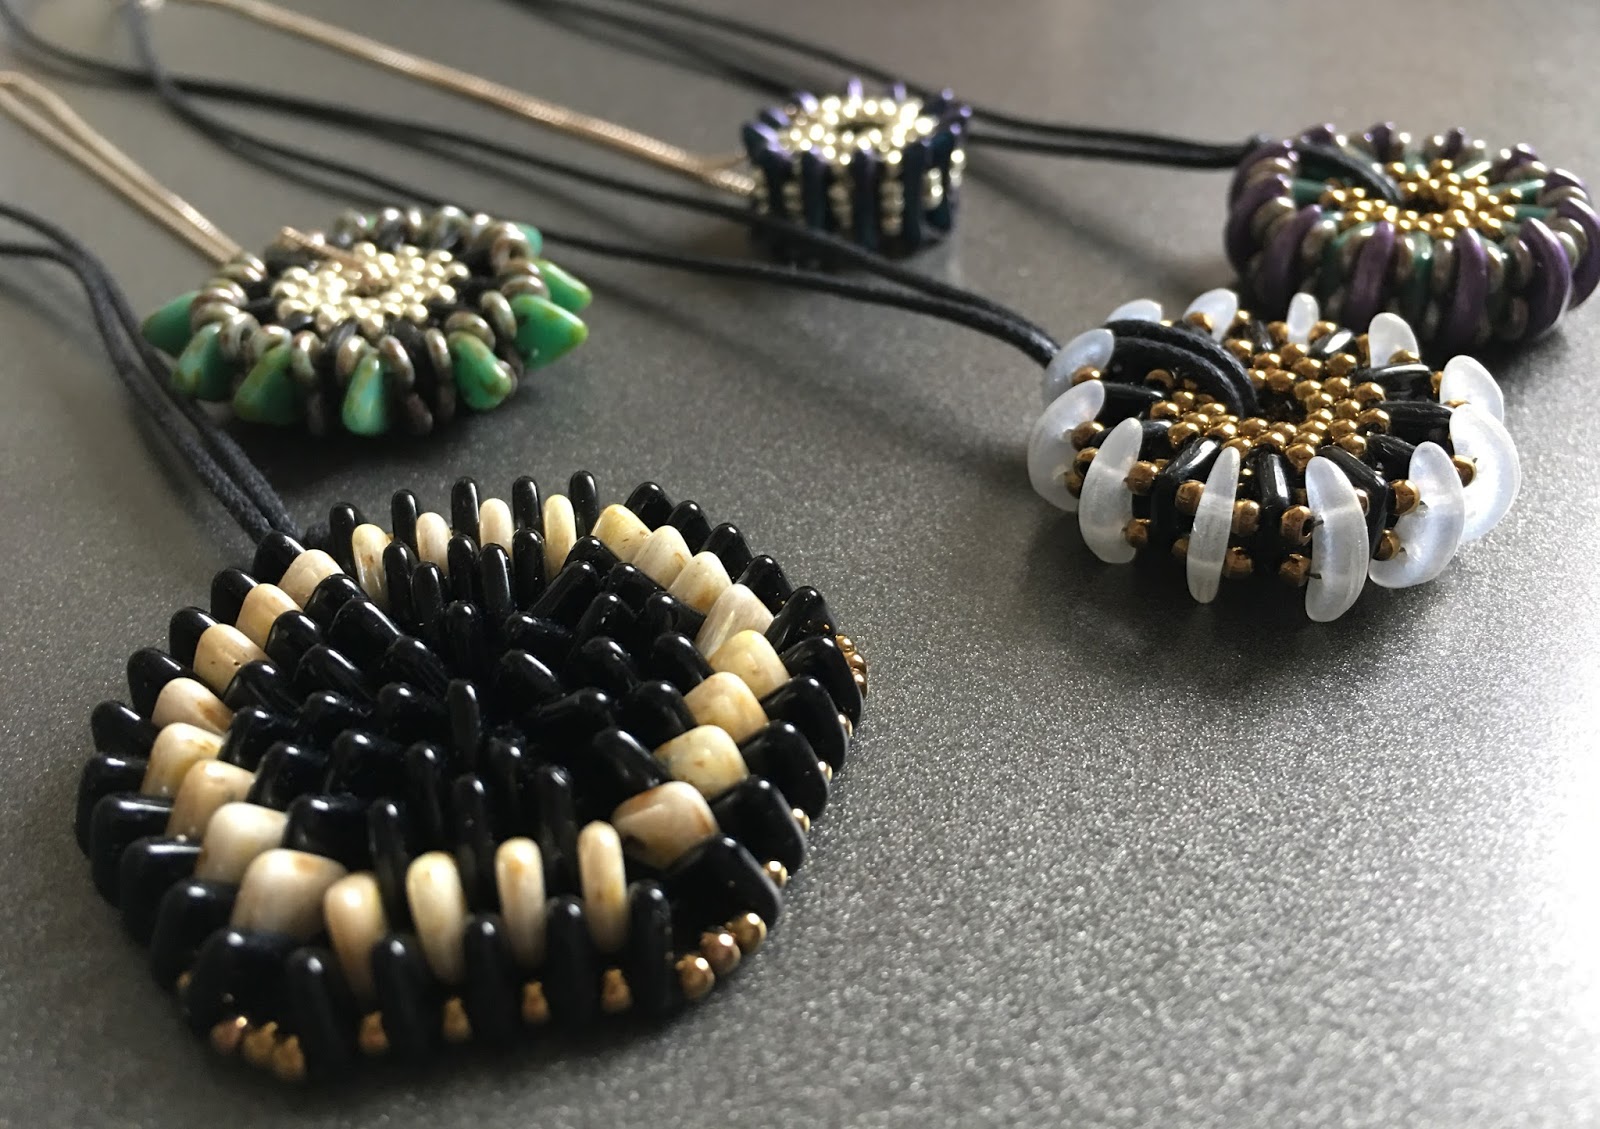
I got five big tote bags crammed full of sample books.
If I could have carried a bag with my teeth, I'd have gotten more.


Each trim sample book had at least three panels full of goodies like this:


I spent a full afternoon carefully removing each sample from the books - they were securely glued to the pages, intended to stand up to lots of wear and tear as a designer used them in consultations with clients. Those babies were SECURE. I sacrificed several fingernails to the process. 

Totally worth it. This is a little bit of the final result, sorted and bagged by type in a futile attempt to organize it...


Right?!? And that's not all - there were two books full of fabulous faux leather samples, perfect for backing bead embroidery projects and other uses.


I'm not gonna lie, these materials have posed some challenges as I've started to use them. But over the next few posts, I'll talk about what I've learned and share some of the things I've made so far. 

Sunday, March 3, 2019

From the UFO Pile, or The Virtue of Letting an Idea Marinate

As part of my dive back into creating, I searched through my (extensive!) unfinished objects collection and found a pile of peyote tubes. I had made them as an experiment in making the same beaded bead using different bead sizes, but never got around to constructing a final product.


The original idea was to line the ones of the same colorways vertically side by side and string them together to create a graduated pendant. What I discovered is that the tension I used when weaving them left too little room between the beads to weave through with any kind of substantial stringing material.

I could have put them on headpins with a stopper bead with a loop on top and string them onto a cord lengthwise, but that wasn't the look I was hoping for.

So they sat. And I pondered. I let the idea marinate for a good long while.

Finally, I decided to weave them together horizontally.


They're strung on waxed cotton cord with another peyote tube to adjust the length. The final red one is just the cotton cording woven to hold the beads in place.


The result is a set of nice lightweight necklaces with adjustable length and a few less UFOs on the pile!

Sunday, February 5, 2017

Theme and Variations

Crescents and rizos and tilas, oh my!

Image result for gif of wizard of oz lions and tiger and bears

The explosion of shapes in two-holed beads makes me feel a little like Dorothy in Oz - so many new things to explore.

I spent one weekend at a show playing with crescents, quad tiles, triangles and o-rings whenever the crowds were slow. Just a few colors, and just a few patterns, but oh so many different results.  Here are a few:


Theme and variations - lots of variety from a limited palette of materials. That's one of the things I love most about beadweaving.


Sunday, March 15, 2015

Melting Lakes and A New Bracelet

The weather around here has been absolutely glorious for the past few days.  Temperatures warm enough to go out with fewer than ten layers of clothes on. Actual, honest to goodness sunshine. Ground visible where before there were waist-high piles of snow.  Spring is truly on its way.

So I went out for a stroll yesterday down to a little park on Lake Michigan that's near my place. It's always a little colder next to the lake than it is a few blocks away, so there was snow on the sand, and large shards of ice being pushed up to the shoreline by the waves of the thawing lake.

Those are thin sheets of ice, each about the size of a poster board, piling up on the
shoreline as the lake melts
and the waves push the surface ice to land
The sky was blue, the ice on the water was sparkling, and people were enjoying the promise of spring.


A week or so, when the snow was still deep on the ground, I finished this bracelet, and to me it just screams "spring!!!!" It's a pattern that came from just sitting and playing with the beads.  With the recent thaw, it seems right to show it now.


You'll see it's kind of the next step in the patterns I developed here as part of one of the Time To Stitch challenges.  I was having ninety-three kinds of fits trying to figure out an appropriate clasp, but I found the cute little citrine colored mushroom-shaped beads, and ta da!


Here's a little video I shot on my phone at the lake.  Ignore the sounds of the people who were behind me and enjoy the gentle sound of the waves under the surface of the ice, whispering the promise of warmer days. (That is, if the video works -- it's behaving very strangely for me....)


Tuesday, July 8, 2014

Adventures In Patinas

Do you work with patinas on your metals?  I make all of my clasps from sterling, gold filled, and copper wire, but I've never really explored putting a patina on them. 


Then I read a really cool tip from Rena Klingenberg on how to oxidize metals using hard boiled eggs. And I decided to play.

I started out with shiny copper wire, and boiled up a couple of eggs. When the eggs were ready, I put a coil of wire, a copper clasp, and the eggs into a zip lock bag, and smooshed (a highly technical term) the eggs, shell and all, into a big gooey mess.


Then I waited about 20 minutes.  And this is what I got!


I need to polish them up a bit, but this is what they looked like straight out of the bag. I was so excited about the possibilities, I threw some more wire and a toggle in the bag, wanting to see what happened if I left it over night.

Sadly, when I opened the ziplock the first time, I must have let out enough of the sulfur gas to make further oxidation impossible. So after an overnight egg bath, this is all that happened.


Lessons learned? First, if you're going to do this, pull together all the metal you want to oxide to do in one batch, because the magic doesn't happen with leftovers.  Second, my husband is a wonderful, patient man who's gotten used enough to my weirdness that instead of calling the folks from the loony bin, he just said, "why is there a bag of smashed eggs and wire on the kitchen counter?" as though it were a normal thing.

I've also read about using a salt/vinegar mix to patinate copper, too. That may be the next mad scientist experiment!

Wednesday, July 25, 2012

Tilas Times Two (Say That A Few Times Fast!)

More results from my experiments with tila beads, again in bracelets.


This first one came from playing with creating the diamond shape.  I only had enough of the tiny crystals to make the section you see, which was too short to make a bracelet for anyone over the age of ten.  In another testament to the value of hoarding collecting beads, I found some larger firepolished beads that matched, to make it just long enough.  They really are the same color, but they have a slight AB finish, so it throws off the appearance in the photo.


The clasp is the first time I've fabricated a toggle, but it turned out better than it had any right to.


The second bracelet was a continuation of the courtship of the tila and the twin hole beads. 


I just noticed the honking long piece of fireline that's hanging out on one edge when I was uploading the pictures.  Dammit.  Time to get a stronger pair of reading glasses if I couldn't see that thing waving around without blowing it up to super size on the computer screen!